I took a break from motor work to waterjet stuff.
 | ||||
| Battery box sides. |
Remember how I hate acrylic?
 |
| Busted. |
I redid everything with polycarb:
 | |
| Polycarbonate hall boards. |
 | |
| Inner-side hub cap caps. |
 | |
| Inner and outer side spacers. Polycarb>acrylic. |
I cut more alignment pins, too:
 |
| Dull dremel bit = burnt steel. |
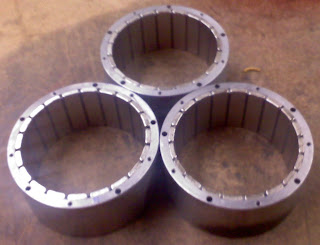
I also press-fit the rest of the hubs/stators:
 | ||
| The two shorter ones are for the rear truck. See Design Review Document for why. |
Next, I did the mill work on the battery box sides and end pieces. This included lots of holes:
 |
| Note: a lot of the dimensions are wrong...old pic. |
 | |
| Both side pieces clamped together and clamped to a support beam. |
 |
| The twist clamps got in the way, so... |
 | |
| ...Much better. |
 | |
| Tapping. |
 |
| Attempting to put holes in the end of a side piece. The drill bit tracked like crazy. |
In retrospect, it would have been much easier to machine the battery box if the end pieces were between the sides, instead of the way it is now. The reason I designed it this way was so any frontal impact forces would not put sheer force on the bolts holding the ends/sides of the battery box together. Drilling the holes into the ends of the side pieces was far from trivial. The drill press table had to be swiveled to the exact location, then the piece had to be squared up and tightened down. Even then, the drill bit tracked badly, I think because the sides of the drill press table are not square. Anyways, it should be good enough...
 |
| Skid plate material. |
I had two choice for skid plates. I order a 12X24" sheet of 1/8" aluminum and of .09" steel from Speedy Metals. After doing some math, it turned out I'd save about 2.5lbs by going with the aluminum. While the steel would have been a lot stronger, I thought the aluminum would be sufficient; if I were to hit something requiring the extra strength of the steel, I'd probably be in pretty bad shape anyways.
 |
| Battery box! |
Stuff left to do on the battery box:
1. Drill and countersink the skid plate.
2. Tap lots of holes.
3. Figure out all component locations.
4. Mount to deck.
5. Seal/waterproof.
I finished winding the rest of the stators and gluing magnets into the rest of the rotors. I couldn't get the packing as tight with these three because their epoxy jobs were worse than the first one
Work left for motors:
1. Wire hall boards.
2. Route wires.
3. Assemble.
4. Test.
5. Configure to motor controllers (time consuming).
6. Seal.
7. Glue tires.
So much time and so little to do...stop, wait, reverse that.


No comments:
Post a Comment