Search This Blog

Thursday, January 25, 2024

Random updates

AMD Epyc workstation build

The H11DSi motherboard I had, which was damaged in shipping so I got for free, wouldn't post, probably because it was damaged. The ebay seller I bought two Epyc 7302's from sent me a 7302 and a 7662...the latter is a lot more expensive, but I need two of the same for the dual socket H11DSi. Installed one in socket 1 of the motherboard to test it. The motherboard powered on, but the BMC LED didn't come on like it was supposed to and it never posted.
 

These problems coupled with the price of 7302's and epyc motherboards increasing for some unknown reason, and lack of motivation led to me abandoning this project. Having good computing resources at work helped kill the motivation. I'm currently in the process of selling off all of the parts. For a brief time I owned a Tesla V100 and two P100's, though. These are great for turning watts into double precision FLOPs.
 
Oooo....shiny
 

Home media server

Currently building a home media server/NAS combo in the old headnode's case. I3-13100T, Asrock Z690 Pro RS, 32GB DDR4, 1GB NVMe boot drive, and 6x18TB=108TB raw HDDs. I finally got it built, but it also wouldn't post (UGH). The DRAM error LED was lit, so maybe the new corsair RAM I bought was bad. OR the brand new motherboard memory channels are shot. OR the processor I bought was bad (was supposed to be a new pull...). I bought another motherboard and more RAM to test, one of those things should fix it. The motherboard has 8 SATA connectors, using 6 for the HDDs, one for a Bluray drive (that I'll put old/hacked firmware on for ripping blurays), and one for an external hotswap SATA port, which I'm planning to use for testing HDDs and creating offline backups. 2 HDDs are shucked WD external drives that I got for cheap on black friday. The other 4 are new Dell-branded Seagate Exos I got from serverpartsdeals for a great price with a 3 year warranty. If you need HDDs or server parts, they're a great company to buy from. They shipped the HDDs in anti-static bags, in custom closed-cell-foam holders in a box, wrapped in fancy bubble wrap, inside of another box.

Old case, new guts. Decided to use this one
because of all the space for HDDs.

The software plan is to install Ubuntu and Docker, and run TrueNAS core (ZFS) in a docker container, and the *arrs, jellyfin, pihole/fail2ban, wireguard, etc in other containers, but I haven't fully figured all of that out yet. There are a bunch of online guides for these things. Going to use RaidZ2 for two-drive-fail-safe, which should give me about 65TiB usable space, which is roughly double what I think I'll need in next few years. If I become a data hoarder, there's room for at least 10 more HDDs in there, and the motherboard has a pcie x16 slot for a HBA..also has a couple x4 slots, which might be enough bandwidth. If tech improves a lot by the time I need more space, I'll just replace the whole server. Solid state storage might be cheaper than HDDs by then.

Update: It was the bios. Updating it to the latest let it post. Maybe a 13th gen proc support problem? If that's the case, idk why the DRAM error light was on. I'm keeping the 4x8GB RAM installed. The 2x16GB RAM will be useful if I ever decide I need 64GB. I returned the spare motherboard. I installed ubuntu on the 1TB NVME drive, uninstalled a bunch of crap that comes with it, and ran short SMART scans on the 6 HDDs. I need to figure out how to use badblocks, smartctl, and smartd to check and monitor HDD health.

3D Printers

I bought a creality K1 on black friday. It's awesome. 


It was only $380. I have about double that "invested" in the wanhao i3 and the K1 prints way faster and better. Amazing how far FDM tech has come. Unfortunately, this is going to hurt motivation to finish CubeXY. I'm planning to transition to prusa slicer from cura soon.

Other

I put a trailer hitch + wiring kit on my prius.

Curt brand. They sell them for just about every vehicle, and the instructions were surprisingly good/easy to follow. Only thing missing was how to deal with the plastic underbody cover. I took it off first, but apparently didn't have to. Getting it back on after installing the hitch required cutting it in a couple places. Of course, that means that if I hadn't taken it off first, then whoever worked on that part of the car next would have to cut the cover off (or take the hitch off), so maybe it was a good thing to do. Overall, took about 2.5 hours. Anyways, the reason I did this is that basically every experience I've had with renting a UHaul truck/van has sucked. Now I can just rent a utility trailer, which is a lot cheaper, too. Should pay for itself in 3 trips where I don't have to rent a truck/van. 

I made a reservation for an Aptera a little over a year ago. They recently removed the estimated delivery date, though, sigh...I think the prius will last a few more years at least, so maybe I'll get the solar car by then. 

I was at AIAA SciTech for a day to give a talk. Unfortunately caught COVID for the first time, ugh. Over it now. 

Haven't done much in the garage. Cleaned a corner of it, so progress? Ha, one day...

1/30/24 update:  

I got to use my hitch! I bought a Craftsman 152 table saw off marketplace. It was in fantastic condition and for a decent price. It was on a sled with wheels, which was convenient. I towed it home on a 5x3' home depot ramp trailer that only cost $25 to rent. I backed the trailer up to the garage and rolled it right in.

Bad pic, mosquitos were swarming me

I'm going to sell the 113 saws, probably as they are (in parts). I decided I'm far more likely to actually make things if I don't have to spend 10+ hours rebuilding one.


Sunday, November 19, 2023

Well that sucked...

Can't believe it's been over a year since I posted anything...nevermind, I can, cause most of 2022 and 2023 sucked. Amid a plethora of life crises, I found out in September that my comps were expiring in December, which meant it was do or die for my PhD. That and all the other terrible things that happened made these the worst few years of my life. But this isn't a life blog; I'll spare you the depressing details, so fun things only:


PhD

First, and finally, after over 7 years as a PhD student and over 10 as a grad student, I'm a Dr. Since I work with launch vehicles, do related research, and am a thermal-fluid subject matter expert, I guess I'm now officially a rocket scientist? I'm so glad it's over, feels surreal, or maybe that's just shellshock+severe burnout+trippy-exhaustion. I'm not sure I'd ever recommend getting a PhD for an aerospace engineer, except maybe if you want to do controls or teach, but I definitely don't recommend trying to get one while working full time. Once you start making real money, motivation and time plummets...there's nothing quite like being on grad-slave wages to motivate finishing. I've heard working while studying is not too bad with a flexible/supportive work place, an excellent advisor/department, and a straightforward project. NASA is a fantastic place to work and, compared to most companies, very understanding of life problems and supportive of higher education. My research had data quality issues (from one experiment I didn't design or run) and was anything but straightforward. That + life :( + real job $= zapped motivation to work on it = 7 year PhD. Don't do what I did, just don't. I'm glad it's over.

The projects that were part of the PhD were pretty cool, though, both related to microgravity propellant slosh dynamics. I got to ride in a Zero-G plane, which was the coolest thing I've ever done and funnest experience I've ever had.

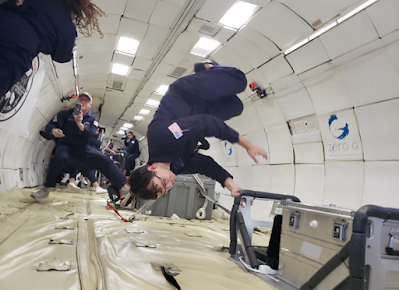
Floating upside down

About 1/3 of the plane puked, but I don't get motion sickness, so it was a blast for me. If you ever get the chance to go on a zero-g plane, do it. I'm still writing a bunch of papers from this research and stuff that spun off it.
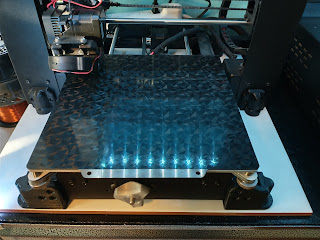

Mill

I got a mini mill off marketplace for a steal.
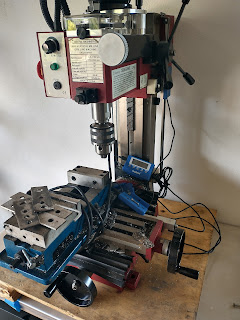
Mini mill is mini

Now I have a mini-mill and mini lathe (relocated), though haven't done (had the time and energy to do) much with either yet. It's sitting on the antique workbench I refurbished....oh! I learned from a car guy why the oil-based paint took forever to harden: FL humidity. You really need to use a dehumidified paint booth in FL. I'll probably make one out of a pop up tent and AC/dehumidifier next time I need to paint something.


Really, it's not a life blog...well, maybe a little

I'm jealous of people who have big home machine shops. That's been my dream since MIT, actually probably since high school, although I can't remember much of anything from back then. I know the me-from-then would be depressed to hear I'm still not quite there yet. I can now see the light at the end of the tunnel, but getting there is, and will continue to be, so much slower than I'd like. Part of the reason is this house...the garage has a low ceiling and is at the bottom of a steep driveway, there's just no good way to get a large mill or lathe in it. Also doesn't have land to build a shop. So I'm planning to move...eventually. House has a bunch of issues that have to be fixed before I can sell it, but it's not like I can afford a house with the current interest rates even after selling this one, so heck knows when that'll happen.

Also, I mentioned NASA is a great place to work, but the salaries are badly lagging industry ...That was always to true to an extent, but inflation and talent demand from all of the rocket companies has made it so much worse the past few years. I applied to blue origin and got an offer way (wayyy) over what I make now, but it came down to a quality of life (more hours, no work from home, less PTO, etc) vs. money thing. I ultimately stayed at NASA. I mentioned my life was sucking...not going to try to convey that here, but most of that wasn't money driven, so I think choosing QoL over money was the right choice, despite a lack of funds being one of the reasons I don't have a nice shop.

I know I said this wasn't a life blog, but I want to say this: life is messy. There are so many posts, articles, blogs, vlogs, etc showing people having everything you might want and living perfect lives...all of it is garbage. They only show you what they want you to see. Unless you're rich, real life isn't like that, so don't feel bad when you see that crap. AI is just making that worse because now pretty much everything on the internet can be faked: pictures, videos, and even whole blogs. There is so much click-bait like "I built this [insert amazing thing] in 1 day!"...bullshit. Them lying like that to generate ad revenue bugs the shit out of me if I let it. I try to be open/honest about how much time and effort the projects I document in this blog take, and I mention everything that inevitably goes wrong. I also don't, and will never, monetize this blog. Ignore all the BS, do your own thing, go at your own pace, and try to have fun when life isn't sucking. I know I'll probably be 40 before I get the shop I want, about 20 years later than I wanted, but I'll get there.


Small Parts Organization

While I didn't have time to do much else related to the shop, I did have time to finally organize all of my screws and small parts. You can actually see some of the organizers I started to accumulate back in late 2021 in a picture in this post, but I didn't start organizing in earnest until this year. The organizers are the Hypertough ones from Walmart, which are the same as the HDX ones from Home Depot except the HDX ones have orange latches and inserts instead of red. They come in 2 packs, used to be $10, then it was $12. Ended up needing over 30 of them. I designed bin inserts for the organizers, which actually cost more in filament than just buying more organizers, though they do save space and are convenient. I designed stackable cabinets to hold them.

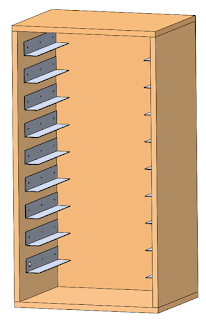
Small parts organizer cabinet

There are a bunch of neat cabinet designs out there for these and other brand organizers. The organizers I'm using had the lowest $/volume ratio I could find, and I think this cabinet will take less time to build than one based on dados. The panels are 3/4 plywood, glued and pocket-hole-screwed. The rails are 1.5x1.5x1/16" aluminum angle, which I can source locally from a place in orlando for cheap, and they may even cut them for me, though I could cut them with my miter saw or chop saw if I really had to. No need for wheels, part of the point of the organizers is that I can pull out the one I need and take it to wherever I'm working. I haven't built the cabinets yet because time and money, and a (functional) tablesaw would be nicer than a circular saw for cutting the panels. The organizers are just stacked at the moment. I also organized medium-sized parts, like arduinos, in storage bins:

Organized

Oh, and as shown above, I moved the printers out of the garage into a spare bedroom-turned-hobby-room.


Rocket Garden

I 3D printed a rocket garden for my desk at work. 
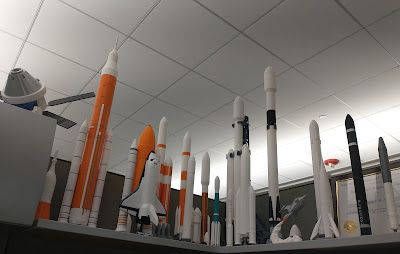
 
Rockets!

All documents are digital now, so I decided to fill up the drab cubical real estate with these. Kind of an old pic, there are more now, and along with a 1/30th scale Apollo lander with astronauts and a rover off to the right. I'm working on a mercury-redstone and the JWST now. I found all of these files for free on the internet, though I occasionally fix things I don't like about them.

Wanhao i3

My ancient shitty, yet super upgraded, wanhao i3 just passed the 25km of filament printed mark! It works juuusssssttttttt well enough to kill my motivation to finish CubeXY. That's also why I haven't bought a new printer, cause that'll just kill my motivation more. Instead, I spend more money on the i3 because that makes sense (/s). I replaced the glass bed+PEI sheet with a magnetic build plate, which is night-and-day easier to use and was worth every penny.

New build plate
 
You can see the knob from a new Y-axis belt tensioner in the above pic, too. The old printed support structure crumbled, so I switch it to back-braced. The braces are now out of the way, though they are not quite as stiff.
 
New braces
I printed a bunch of random things over the past year, like this mechanical dragonfly:

For the wings, I printed one layer of clear PETG on a textured build plate, then used atomic filament bronze PETG for the rest. I think they came out decently realistic. I think the oof stones might be my favorite:

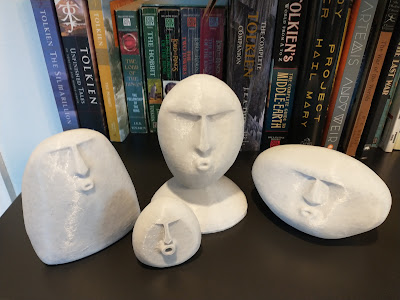
Printed with Atomic Filament Marble PETG

Future plans:

Table saw: Come December, it'll be the 2 year anniversary of having a disassembled 113 table saw in my garage. I bought a second one recently for spare parts and it has a much nicer fence than the original. I should be able to make one nice saw from all that, and sell the left overs. I will finish it. All the pics and the blog entries on this have turned out to be super helpful since I don't remember what goes where.

Workbench: 3-year anniversary, and I don't have all of the tools that were going to go in this anymore, so it needs some re-design... 😅 I'll definitely finish this. Need a working table saw first. 

CubeXY 3D printer: over 4 years (RIP). I still have all of the parts, just never got around to assembling it. But I will finish it, and it might will be awesome. 

H1 rocket engine turbine display case: Now that I finally have a mill, I can cut the parts for a stand for this. Need to de-rust it first.

Homelab: I have access to compute clusters at work, so I don't have plans to build a new homelab cluster. I have (very) slowly been accumulating parts to build a dual AMD EPYC machine, which, if my calculations were correct all those years ago, it should be nearly as fast as my entire cluster was. I still have the old head node, not exactly sure what I'm going to do with it yet, maybe turn it in to a NAS since it has a bunch of drive bays. I want to set up some self-hosted services. 


That's all for now.

Saturday, July 16, 2022

Fixing House Wifi

 I finally got around to replacing the crappy mesh wifi system with a "real" wifi network. This was my first time running and terminating ethernet cables. I bought some tools to practice with: klein tools cutter, stripper, and male pass-thru crimper, a monoprice impact punch-down tool, and a cable tester. I made a short patch cable for practice, and it came out good on the first try.

Making patch cables is silly since 2 good quality connectors cost more than a pre-made patch cable, so I bought the others I'll need. I bought a partial spool of CAT6 cable off craigslist a year or so ago, and about 50ft of smurf tube conduit from a friend. I wanted to do some future proofing with this upgrade, so I bought Wifi-6 hardware. It took me awhile to figure out exactly what I wanted. I ended up going with a TP-Link AX1800 router because it was cheap and powerful enough to cover half of the house. The wireless access point choice for the other half of the house was a little trickier. I bought a 48 port gigabit POE switch for a steal off reddit last year because I had big plans to wire the whole house with ethernet drops and cameras. Since this is my first post about it, clearly that never happened, but I still plan on slowly adding drops, cameras, etc. That switch is POE standard 802.3af, which is limited to 15W per device. Many of the newer (Wifi-6) WAPs are 802.3at, which has a 30W limit, so if I want to use this switch, which I do, then I can't use 802.3at WAPs. That narrowed the selection substantially, and I ended up going with a Ubiquiti U6-Lite. However, since I only have one POE device at the moment, running the switch would be a waste of electricity, so I bought a POE injector to go with the U6-Lite. Eventually, when I have more devices and ethernet drops, I'll switch to the switch. I did some testing with a super long ethernet cable to figure out the best place for the WAP. Once I had that figured out, it was time to run ethernet there. I wanted to relocate the modem and router to one of the attics, where I plan to have a small rack eventually. That's not the same attic as the one above where the WAP was going, so this ethernet run was kind of a pain. I used cable clips in the attic above where the WAP was going since I wasn't planning to run anymore cables up there anytime soon. 

Green cable is ethernet.

Terminated cable.
I installed the smurf tube in the attic where the router was moved to because I will eventually have many ethernet cables running through there. 


Other end of the WAP cable.
 I pulled string through the conduit with the cable to make adding cables in the future easy. I'm going to terminate all of the ethernet ends with punch-down keystone jacks. Once I get a rack, I'll get a patch panel and mount all of the keystone jacks.

Tested good!

Blue = working

Finally, I had to setup the router and WAP. The router has an easy-to-use web interface. The WAP requires installing Ubiquiti's UniFi Network application on your phone or computer. This picks up a hidden network broadcast by the WAP(s), which then allows you to configure it. I set the WAP SSID and password to be the same as the router's. 

Then I walked around with my phone running internet ping and speed tests. Both ping and speed are MUCH better with the new router and 1 WAP than with the mesh wifi system, which had 1 router and 4 satellites. I can actually max out my internet download speed over wifi now. 

The next step is to run ethernet drops to the office, which is right below the attic that the router is now in. Then run ethernet drops to other parts of the house and hook up the big switch. Then get a rack and make it all look nice. 
 
Update: ran two drops to office, then stopped. Haven't hooked up the switch yet since there are enough ports in my router.

Friday, June 17, 2022

Whirlpool Duet Dryer Repair

Our Whirlpool Duet Dryer stopped working. Lights would light up, but pressing the start button would cause a "F01" error code. Turns out the dryer comes with a troubleshooting manual, which was in a pocket attached to the inside of the lower front panel. 

Very thorough

The recommendation for the F01 error code was replacing the main board, which is expensive. I followed some of the other troubleshooting steps, particularly for the motor, since that wasn't starting. The control board is accessible by removing 3 screws in the back and sliding the top of the dryer towards to back and off.

Main control board. I took pictures of all of the
cables before disassembling.

One step had me measure the resistance across two pins on the main board, which came out to ~2 Ohms, meaning they were shorted. The recommendation was then to replace the main board. Using the circuit board and the circuit diagram, I figured out that that was measuring across the motor power relay. The relay also smelled like magic smoke. Ah ha! Relays have a limited life span, and after some googling, I found out that this relay often dies in these dryers: youtube link

This relay smelled toasty.

Control board was held in with one screw and
had tabs that slid out of slots in the sheet metal.

I used popsicle sticks to push back the 6 plastic tabs holding the control
 board into the plastic carrier, which then allowed me to pull the board out. 

Yup, motor relay let out the magic smoke...

This dryer has an AC power relay, and I'm guessing it has logic to not close the power relay if it detects a short elsewhere, which was likely why the (DC) controls seemed to be working, but the motor and heater were not. Anyways, the motor relay is a strange package, so I had to find an exact replacement: Omron G8P-1A4P 12VDC 30A 250V. Unfortunately, they don't make them anymore, but there seems to be ample stock on eBay and Amazon, along with some non-Omron substitutes. When replacing relays, make sure to get the correct coil voltage (the 12VDC) and at least the stated power ratings (30A, 250V). If I hadn't been able to find this relay in this package, I would have bought one with the same specs and used wires to solder to the correct pads.


Luckily this relay is through-hole, so removing it was easy using a solder sucker. Unfortunately, the death-throes of the old relay burnt one of the pads. I could still sort of solder to it, but the connection to the trace was poor, so I added a wire to take some of the current. 


Replacement done.

It lives!!

I reinstalled the control board, and powered up the dryer for a test: it worked. I took the opportunity to vacuum under and in the dryer while the panels were off, then reinstalled the panels. 

Total cost was $14, maybe 2 hours total of my time. Replacing the control board would have easily been $400, and I don't want to think about how much a new dryer costs these days. It pays to know how to fix things.

Monday, April 18, 2022

Craftsman Table Saw Refurbishment, part3. Rust Removal

I've been slowly working on the table saw. I showed most of the disassembly in the last post. I bought snap ring pliers to disassemble the arbor.


I bought new, good quality bearings (Koyo and Nachi) off ebay for the arbor and motor. I also bought a snap ring kit from harbor freight, and a new woodruff key from Ace.  

Rust Removal

I used evaporust for the small parts. Just soak the parts in it, and it magically strips the rust off. It even gets rust out of small holes and screw threads. I then wash and dry the parts off and immediately coat them in CRC 3-36 rust and corrosion inhibitor. Many people like T-9 Boeshield, but I already had a can of this, and it works great. I put the parts in a small bag, spray the CRC into the bag, and mix the parts around it. This conserves the CRC while making less of a mess than trying to spray the parts outside the bag. Steel parts start rusting again almost immediately after drying, so I made sure to coat them in CRC ASAP. The CRC takes a day or two to "dry". I don't think it fully dries, which makes the coating somewhat self-healing, which is nice. Some of the parts have been coated for over a month now with no signs of rust, so it clearly works well. 


No before shot, but these were all rusty pre-evaporust.

Coated parts drying on wax paper. New parts to coat in bag.

Evaporust is expensive, ~$30/gallon. That's too expensive to buy enough to immerse large parts in, like the wings. The bottle says you can soak papertowels in evaporust, wrap them around your part, then wrap all that in plastic wrap. I tried this, and it was a mess:

Looks simple, but a pain in the ass in reality.

Gross

Yeah...I wasn't happy with the results. Made a mess of icky paper towels, and didn't do a good job getting the rust off. I don't recommend that technique. Time for a manual method: wire wheel, scotchbright pads, and WD-40. This took multiple hours per wing and was a huge pain, but I was able to get most of the rust off. I then wiped them down with mineral spirits to get the WD-40 off, followed by a coat of CRC. They weren't perfect: still some black staining on top surface, which I don't think I could get off without sandblasting or sanding.


It was around this point that I realized I needed a better way to remove rust from intricate, large parts. I'd heard of electrolytic rust removal before, but I hadn't tried it until now. I used a part from an old rusty hand plane that I found under the old garage cabinets I tore out as a test piece. 


I sanded/filed the rust off of a patch of it and wrapped a piece of copper wire around it. A current controlled power supply supplies DC electricity for the electrolysis. The part to derust is the cathode. I used an old tin (tin coated steel) can as a sacrificial anode. The positive lead of the power supply is connected to the anode and the negative lead to the cathode (part to derust). The cathode and anode are submersed in a 5 gallon bucket full of water + baking soda. I made sure not to submerse my power supply leads so they wouldn't corrode. The baking soda splits into ions and acts as the electrolyte. The rust on the cathode is reduced (removed) and pulled into the solution, while the anode is oxidized (rusted if steel), which is why I called the anode "sacrificial". The electricity also splits the water: hydrogen gas is produced on the cathode, and oxygen gas on the anode, so you know it's working when you see gas bubbles forming. I set the voltage max to 24V and turned up the current to a max of about 2A. I added baking soda while stirring with a wood stick until the current stopped climbing. I then let it sit for ~12 hours.

The water got a lot grosser

No more rust!

It worked great at removing the rust from the part. I rinsed the part off and then coated in CRC. The can anode was almost rusted-through, though. I decided to try this on a larger part, this time the trunnion. Because this part was larger, I used two flattened cans as anodes, one on either side, which helps distribute the electric field more evenly, and thus remove rust more evenly. I also flipped it over about half way. The current got up to 5A this time due to the larger surface areas of the cathode and anodes, which was the max of the power supply. Many people use high-current lead acid battery chargers for this, and I see why. More current = faster rust removal. 

Super gross. Rusty foam.

Post rust-removal and rinsing. You can see it started rusting almost immediately.

Coated in CRC

Interestingly, the trunnion re-rusted in the following week. This was the first part I had re-rust after coating it in CRC. I don't think I dried enough prior to coating, and the CRC must not have displaced the moisture very well. I'm not really sure what to do about that, though. I tried using a heat gun to dry it out quickly, but that made the rust form faster. I might have to re-do the electrolysis (hopefully it'll remove the black crud), wipe it down, dry it out really well with the heat gun, then wipe off the rust with mineral spirits + scotchbrite or something like that before coating it in CRC. 

The electrolysis products might look gross, but they aren't harmful. Don't use stainless steel electrodes, though, because that can cause some of the toxic elements that are in stainless steel to leech out. Graphite, rare metal oxide coated metal, and platinum also make good electrodes that don't wear as fast as steel (or at all). I'm using baking soda for the electrolyte, which is mild. Something like sodium hydroxide would also work, but would result in a basic (high pH) solution that would need to be neutralized with acid before dumping. I wear goggles and arm-length rubber gloves in a well ventilated space when using these chemicals. If you use them, be smart about it.

One annoying aspect of this method is the green-black particulate that ends up coating the part. Assuming your part isn't intricate, unlike the trunnion, it's not hard to scrape off with scotchbright, but part of the point of this method is to not have to do a lot of manual work. I only scraped it off of the important surfaces I could reach on the trunnion, hopefully that's sufficient. So what is it? Well, there's a lot of speculation and myths about it on web tutorials and forums. Some people blame the bicarbonate/carbonates from the electrolyte, or impurities from tap water. I know it's not the tap water because I actually used deionized water in the 5 gallon bucket test and saw it in that. I couldn't find any carbonate compounds that could have formed that were that color either. I'm 90% sure it's ferrous oxide (FeO) and/or Fe3O4, which will form in oxygen-poor environments instead of ferric oxide (Fe2O3, aka, rust), and I'm pretty sure it's coming from oxidation of the sacrificial steel anode. Some of it might also be tin oxide (SnO) from the tin coating. FeO, Fe3O4, and SnO are black powders. It makes sense that they'd end up in suspension in the water, and then end up coating everything. When I dumped the gross water leftover from the trunnion electrolysis, I left some of the water+black powder coating the walls and bottom of the container, and left it outside for a few hours. If it was primarily FeO or Fe3O4, the now-oxygen-rich environment would cause it to oxidize into Fe2O3, which is orange colored. If it was SnO, it would oxidize into SnO2, which is white. It all turned orange in a few hours, which confirms my hypothesis that it is FeO or Fe3O4. It shouldn't be possible for the electrolysis to be stripping raw iron off of the cathode and forming it. Thus, it's either forming from the rust pulled off of the cathode or from oxidation of the anode. 

I bought some cheap graphite sheets of eBay. I also bought some sodium hydroxide (lye drain cleaner powder), hydrochloric acid (muriatic acid), and litmus paper. I did some more experiments with random rusted parts. These parts are small enough that I'd normally soak them in evaporust, but the goal here is to try to improve the process for large parts.   

1. Test piece: another rusty part off of the hand planer. I used sodium hydroxide instead of baking soda, and a tin can for the anode. It didn't take much sodium hydroxide to maximize current, only a tablespoon or so for the bucket. I ran this test for about 5 hours. Surprisingly, this electrolyte resulted in a lot less green-black particulate and less anode corrosion. In fact, the anode came out with hardly any rust on it, though it was noticeably thinner. It turns out that a very basic environment can actual reduce steel corrosion. I found a paper online that suggests the mechanism is related to OH- ions forming a barrier to prevent oxidation. This is similar to why steel doesn't rust in concrete: concrete is a basic environment. Anyways, I used the HCl to neutralize the electrolyte solution prior to dumping it. I noticed green-black powder when I dumped it, but also some white, which is probably SnO2 or NaCl (salt). 


Electrolysis doesn't remove staining, but does remove the rust.

2. Test piece: another rusty part off of the hand planer. Electrolyte: Baking soda + water. Anode: graphite sheet. I ran this test for about 4 hours. For the first 3 or so of it, there was hardly any black particulate, but the last hour saw a large build up of it. This seemed to correspond to the bucket getting very warm. Also could have been the graphite becoming pitted, which probably enhanced erosion. The graphite will oxidize and form primarily CO2, but I'm guessing that some of it just eroded into the solution as particulate. This black stuff was easier to get off of the part afterwards and looks like soot. The graphite sheet lost about 0.05mm thickness during the test, which is a lot less erosion than the steel, but still pretty significant (~0.5 cm^3). Only the side that was facing the cathode was eroded. 

3. Test piece: another rusty part off the hand planer. Electrolyte: Sodium hydroxide + water. Anode: graphite sheet. Black particulate was noticeable after the first hour, so it's likely the pitted surface of the graphite is enhancing erosion relative to a smooth surface. I ran this test for about 6 hours, longer because this part was more complex. It removed the rust, but I had to scrape/wipe the black gunk off of it. This black gunk/particulate doesn't turn into rust when exposed to atmosphere, so I'm 99% sure it is eroded graphite. The electrode lost about 0.15mm thickness this time, which is something like twice the erosion rate than with the baking soda electrolyte. I'm not sure how much of that was due to the difference in electrolyte vs. already starting out with a pitted surface, though. Regardless, it doesn't look like sodium hydroxide offers any benefits for electrolysis with graphite anodes. 

Pre-start-up

4. Test piece: another rusty part off of the hand planer. Electrolyte: baking soda + water. Anode: Ir-Ru MMO coated Ti mesh. I bought the anode from The Electrode Supply. Very reasonable prices for MMO and Platinum electroplated Ti anodes, as well as plain Ti cathodes. This was the best combination of everything I've tried. After 9 hours, the anode had no noticeable wear, and the water only had rust flakes in it, no black gunk. I still had to wipe/scrub loose rust off of the part. This part was more intricate than the last ones, and electrolysis doesn't do a great job in nooks and crannies because the electric field is weaker there. No black gunk made it easier to clean off. I expect using sodium hydroxide instead of baking soda would have had a similar result. 

Top: MMO coated Ti mesh, Bottom: Plain Ti mesh


Rust flakes in bottom, water still fairly clear.

Final Words on Rust Removal

I've used and documented many rust removal techniques in this blog. Here's my opinion on when to use which:
  • Small parts: soak in evaporust
  • Parts too large to soak in evaporust, but smaller than the largest non-conductive watertight container that you own or can easily obtain: electrolysis with MMO anode and baking soda to avoid the black particulate coating. If you can't get or don't have a MMO anode, (and assuming you're safety-conscious) sodium hydroxide will result in less black particulate with a steel anode than sodium carbonate or sodium bicarbonate. Graphite anodes will wear slower than steel anodes, but the eroded graphite is only slightly less annoying than the black particulate generated by steel anodes. 
  • Parts too large for the largest non-conductive watertight container that you own or can easily obtain, and/or if you have an outdoor space in which you can use a professional sandblaster (also assuming you own a nice sandblaster): sandblasting
  • Parts too large for the largest non-conductive watertight container that you own or can easily obtain, and if you don't have a professional sandblaster or a place to use it: angle grinder with wire wheels
  • If money is not a problem: toss or sell whatever it is, buy a new one, and keep it coated in a rust-inhibitor to prevent rust from ever occurring. 
Evaporust will not strip paint unless rust is underneath the paint. Electrolysis will sometimes strip paint. If you have small rusty parts that also have paint you need to strip, a sandblaster might be a better option: I have a small sandblaster that works well for that kind of thing. A nice plus with the sandblaster is that it doesn't get the parts wet, so they don't rust quite as fast afterwards. Always immediately coat whatever part you removed rust from in something that prevents rusting, e.g. rust-inhibiting paint-primer, oil, paste wax, WD-40, CRC 3-36, etc.

Next Steps

I need to de-rust some motor parts, as well as the main top plate. Then it's on to re-assembly! I'm planning a few modifications:

1. Make some zero-clearance throat plate inserts
2. Add a splitter behind the blade
3. Reinforce the sidewall where the bevel screw braces to prevent it from bowing. 
4. New fence?