Temperature strength test
I did one of these at 200C. Came out looking very nice. Apart from the over extrusion spots at the start of new layers, which added about 0.1-0.2mm, the ODs were exactly right. It was pretty strong too. The shaft snapped before the base came off, which I had to use pliers to rip off. Since the print quality is good, this is probably the temperature I'll use for most prints.Hollow pyramid
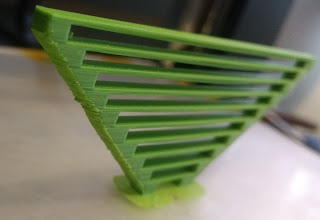
Came out pretty good. This was the first print I did with 0.5mm line width instead of 0.4mm. Some heat warping at tip, but I didn't slow it down at all (40 mm/s, 200C), so that's not surprising. A little drooping on the inside of the legs, probably due to running a little too hot. Cooling fan was on max, so I don't think it needs more cooling.
Holey plates
I designed these to test how much larger I need to make holes in CAD. One was printed vertical and one horizontal, though they both had similar results. The circles need about 1/2 line width extra (~0.2mm) on the diameter, which is actually less than the standard for arc compensation, which is 1/2 line width on the radius. I wonder if CURA is doing some compensation already. I've heard you can make/modify slicers auto compensate for it. The straight edged holes (square and hexagonal) only need about 1/4 line width extra (~0.1mm) on the edge-to-edge width. The vertical width of the holes on the one with horizontally oriented holes was generally shorter than the other dimension, likely due to sag, but it was within one layer height (0.2mm). Overall, pretty happy with these. So my rules will be: +0.1mm on radii of circles and +0.1mm on width of square and hexagonal holes, regardless of orientation. Also, outer dimensions appear to be within 1/2 line width or one layer thickness (~0.2mm for most of what I print). From other tests, circular objects' OD's tend to be closer to desired diameter +0.1/-0 mm. Note: this will vary from printer to printer. You should do your own hole tests, but these might be good starting guesses.
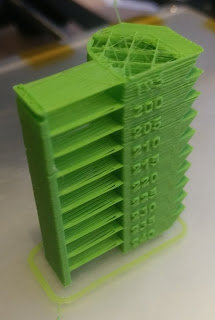
Heat tower
I printed this with -20C from the numbers on the part (starting at 220C) because I already knew that 240 and 230C were too hot (with this nozzle) from prior prints. 0.2mm layer height, 0.5mm line width, 40mm/s speed. It took about an hour. I used CURA's post processing modify gcode extension "TweakAtZ" to change the extruder temperature every 5mm. Worked great. As you can see, the 220C didn't droop much. At 220C, I can watch filament ooze out of the nozzle at idle, so the fact the bridge didn't droop is probably due to the crazy amount of cooling I have. The individual lines didn't merge well, though...would need at least one more layer to make the bridge solid. Temperature didn't seem to affect line merging. You can see a lot of scaring on the sides of this print. This is due to using only one 0.5mm perimeter (no inner wall), so the infill (20% grid) is showing through. The numbers came out great. Oddly, I didn't get any stringing until 190C...typically you see it at higher temperatures due to oozing and not lower. I poor lamination was causing the nozzle to get plastic on the side of it that would then string. The lower temperature levels are less glossy, too. Underextrusion started at 185C, though that might have been because the filament on the spool was tangled. Definite temperature driven under extrusion/layer adhesion problems at 180C. I stopped the print it at 170C. 200 C looks like a good value, which is what I've been using.
Correct 3D printer extruder temperatures are dependent on a lot of factors: the material being printed (PLA, ABS, etc), brand of filament, age of filament, distance between thermistor and nozzle, materials between thermistor and nozzle, thermistor and measurement electronics accuracy, amount of insulation and cooling, nozzle mass and material, etc. Whenever one of these is changed, the extruder temperature has to be changed, too. It's more of an art than a science, but calibration prints like the heat tower can help make it more scientific.
Bridging
First attempt:
The printer had more issues with the 40 degree angled supports than the bridges. Here's what was happening: The small cross sectional area of the supports would be in contact with the nozzle long enough to cause warping. The cooling wasn't sufficient to counteract the heating, so outer edge would curl up a couple mm. When it got to a bridge slice, then the cross sectional area suddenly got much larger, so the nozzle spent less time at the edges, resulting in less heating and curling. It would smash the previously curled up edge down with every pass, and by the last bridge layer, the top would be flat. Interestingly, the problem is worse on the left side, which makes sense because the DiiiCooler's fan entrance is on the right side, so the cooling is higher there. I saw this with the hollow pyramid as well, though not as extreme. I decreased the temperature as Z increased, started at 200C and was at 190C by the 4th bridge. 200C was starting to droop at the 20mm bridge.
Second attempt:
The first attempt was printed with no infill, all perimeters. The second attempt used 2 perimeters and 50% infill to try to decrease the amount of time the nozzle spends in contact with the small cross section of the supports. This increased the projected print time from about 30 min to about 50 min, which means it's going slower overall, which is probably good for cooling. I also dropped the cooler down in Z with another washer, so it's now sitting about ~1mm above the part. I decreased the extruder temp to 195C, though I turned it up to 200C again for the 7th and 8th bridge just to see what would happen (bridged ok, supports were worse). These things (minus turning the temperature back up) definitely helped, but the edge still curls up, particularly on the left side. Slowing the print speed down 50% during the support-only (non-bridge) layers helped a lot. CURA's minimum layer time is 5s by default, which probably isn't high enough for small feature overhangs like these angled supports. The 3DBenchy smokestack came out ok at full speed, but that isn't an overhang. So key takeaway for small features with overhangs: need maximum cooling, go slow, use CURA's minimum layer time. Don't need to worry about this if don't have overhangs. Another thing to note: The first layer of the bridge, even the longest, didn't droop at all. Subsequent layers, particularly the zig zagging layers, caused the lowest layer to droop by pulling on the individual long strands.


No comments:
Post a Comment